Contributors

Thursday, 22 May 2014

Vanilla Swiss-Roll, Carrot Cupcakes & Orange and Almond Cake

Today's practical is a mouthful - as you can see by the heading of this post. Reason being is campus was cancelled yesterday (due to some reasons I still don't know about) so we had to get 2 slots of practicals done today in one slot.

The class worked as a big group preparing the Orange & Almond cake & the Carrot Cupcakes whilst we all, in groups of two had to make a Swiss-Roll .. It was the first time I was going to be making a Swiss-Roll so I was excited. Now when I think about it, I actually think I did most of the Swiss-Roll preparation on my own, except the part where I told Terene to spread some Chantilly Cream on the Swiss-Roll so that I could take a picture .. LOL shame, she didn't even say much. Just let me do my own thing. [Thanks Terene :)]

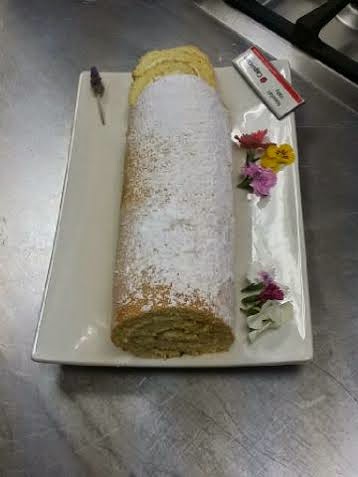
Ya so, the Swiss-Roll was a hit! It didn't crack so we were overjoyed. The Vanilla Chantilly cream that we made as the filling instead of the Bavarian filling that we were supposed to make was a DOUBLE hit. I have never tasted anything better than Vanilla Chantilly cream, I am definitely going to use it in a lot of ways in the future of me being a Pastry Chef. Our Swiss-Roll looked stunning at the end too, with some icing sugar dusted on top & some edible flowers placed on the side to add some colour. & tadaaa. A proud moment was born. In actual fact, my mum has told me now that on Saturday she wants me to bake another Swiss-Roll because it was, I quote her words "..tooo tasty!" 


The Carrot Cupcakes looked too beautiful. They were topped off with some Cream Cheese icing. 

We made the Orange & Almond Cake & shew, was that cake moist or what? We were supposed to pipe some Cream Cheese icing on the cake but we were exhausted & really wanted to go home, so I just spooned the icing on the cake & spread it out. I then took some whole almonds & gave it a rough chop & sprinkled that on top of the cake along with a few whole almonds scattered around. I wanted to give the cake a natural, simple look that still looked well presented but proved to you that 'Less is MORE!'

So I have pictures down below for you to see. Hope you enjoy the 'view' ..


Carrot Cupcakes with some Cream Cheese Frosting & a Chocolate Sauce Drizzle.

One of the happiest moments of my life - IT DID NOT CRACK. Lol I think that's the only worry of every first timer Swiss-Roll maker.

After the Swiss-Roll was left to cool down (Picture above this one) we unrolled it & spread Vanilla Chantilly cream on it .. I just can't get over this cream. Honestly it's superfantabulisticexyaladocious! (Mind the spelling)

We re-rolled the Swiss-Roll after filling it with Vanilla Chantilly Cream & then finished it off by dusting some Icing Sugar on top. When the Swiss-Roll just got out the oven, it was placed on a sheet of waxed paper that had Castor Sugar sprinkled all over it so that also added the right amount of sweetness you want to get from the actual Swiss-Roll Cake.

& we are done! Tadaaa! Just placed some edible flowers around the Swiss-Roll to add some colour.


The texture was AMAZING & the overall sweetness was PERFECT. 

The Orange & Almond Cake. I'm not a fan of Orange in cakes as well as Carrots etc that's why this cake & the carrot cupcakes won't be on my favourite list. Fruits and cakes, for me, just don't go together. In order to try and forget the fact that this IS an ORANGE & Almond cake, I just decorated it with Almonds. NO slices of orange or anything to do with orange, thank you very much. But it does look pretty, right ... 

....right. It's pretty.

Until next time, keep your life frosted! <3

Wednesday, 21 May 2014

Gingerbread House Practical Assessment

I must say, this practical was the most looked forward too one of the year (so far) for me! I mean I was excited! My group: Ian, Shefali, Nomfundo & I were excited! The ideas were just pouring out of our thinking caps, we wanted to do so much!

However, when we got to the actual day of doing the practical, it was nerve-wrecking. Isn't that always the case? LOL.

So basically last week Wednesday we had to bake the gingerbread & create a template with which we can work with to cut out our house. We had to assemble the house on Wednesday & decorating was too be done on Thursday.

Assembling was fine, but the roof was a catastrophe. Especially Ian's ideas (If only I took a picture of the roof that Ian designed, you'll fall over laughing) - but at the end of it all, we learnt a lot. We also had a balcony (Ian's ideas, of course :/ ) & a chimney which was the Girls' ideas. We had a light too that we were to put inside the house after it was decorated, which we did do, & the light shone through the windows. It was cute. 


So basically after assembling on Wednesday (Nomfundo & I had to do some last minute repairs before we left as the one part of the roof fell down, was NOT funny at that time) & after me praying the whole of Wednesday night for the house to still to be standing  the next day, it was Thursday & it was time to decorate. The fun part right? Ya. But the tiring part too. VERY tiring.

So we covered the roof in this chocolate biscuit things which were pringle shaped? & then stuck wafer biscuits on the side walls to make it look like bricks? The windows were done out of sparkle sweets that were melted. Ian managed to put his balcony up somehow after it fell down I don't know how many times. The board was covered with white fondant then royal icing then glitter to look like snow. Our idea was basically that the winter season is coming to an end so the snow is melting. We outlined the windows & door frame with jelly tots. Ian created his own lil garden on the side. OH AND he wanted a car, which Shefali molded for him coz his looked bad. 

Ya, & jellybabies were the 'people' living in that house. We did the rest of the decorations with royal icing. Everything was edible.

We were & are really proud of our piece. But now when I look at it, I can see SO MANY things I would do differently next time to make it a neater, blolder & much more vibrant house. At the end, even though it was a tiring two days, we all had lots of FUN & the group & I were happy. It was a great group effort & we had a lot of team spirit. Bearing in mind my group were all second year students whilst I was the only first year, it went well. GO TEAM!

Hope you enjoy the before & after pictures! :)


Just when we were done with the assembling on Wednesday.
DONE! Ian's garden gate on the left, our jelly baby people all over having their own lil conversations. Pathway showing the way into the house which was actually milk chocolate buttons.

The side of the house on Wednesday. That long rectangular horizontal piece is Ian's balcony. Yes mind the mess. There was royal icing EVERYWHERE!

The side of the house. How CUTE is the chimney? I love it! & Ian's balcony is standing! Thank you Strawberry Wafer Sticks! & there's Ian's lil cute car made out of fondant haha. 


The other side of the house with the windows & the wafer bricks.

A better view of Ian's garden & his garden gate made out of strawberry wafer sticks.
The overall Gingerbread house! Not bad for first timers right?

Until next time, keep your life frosted! <3

Tuesday, 20 May 2014

Chocolate Financier & some Flooding Work

As many of you know from my last blog post, I am quite behind with my posts but I'm getting there, slowly but surely! This is a practical we did two weeks ago I think.

So firstly, you must be wondering what on earth is a Financier. I found a some info on Wikipedia which explains it perfectly.
"A financier is a small French cake. The financier is light and moist, similar to sponge cake and usually contains almond flour, crushed or ground almonds, or almond flavoring. The distinctive feature of the recipe is 
beurre noisette  (brown butter).Other ingredients include egg whites, flour, and powdered sugar. Financiers are baked in shaped molds, usually small rectangular loaves similar in size to petit fours.
The name financier is said to derive from the traditional rectangular mold, which resembles a bar of gold. Another theory says that the cake became popular in the financial district of Paris surrounding the Paris Stock Exchange."
Financier pans are traditionally rectangular, but other shapes are not uncommon." 

Our Financiers looked like cupcakes haha. However it had a really deep chocolate taste that I didn't like much (it had dark chocolate AND cocoa powder in the mixture :| ) so that was a bit too chocolatey for me. We then had to make some buttercream & pipe it on the top BUT only a lil amount as the sugar work which goes ON TOP of the buttercream supposed to be the focal point.

In my personal opinion, I found the buttercream too sweet to be going on a cake that was already so chocolatey and ... I mean it just wasn't the right combo for me. I would like to whip some cream and pipe whipped cream on top so that the rich chocolate taste gets toned down a bit. Also, I would like to pipe a lot more of the buttercream/whipped cream on top to make it look prettier.

We did some sugar work our goal was to get a round ball kind of piece which wasn't that easy to achieve.

We also did some flooding work on biscuits. Flooding is basically covering & decorating a biscuit with royal icing. You can also just write on the biscuit etc.

Tomorrow night there will be a blog post about the Gingerbread houses we made last week! So hope to see you tomorrow! Enjoy the pictures!


Until next time (Tomorrow), keep your life frosted! <3

Thursday, 15 May 2014

Cake Decorating Practical Exam

This exam took place on April, 30th. Yes, I've been delayed for a while.

For this practical exam, we had to bake, ice & decorate a Genoise Sponge Cake. It could be a full, round cake or it could be one slice of the cake decorated around all three sides. I chose to do a slice as my cake baked into a lopsided shape so I preferred to create a slice due to height.

I needed height because I decided to do Ombre around the sides and then on top, flowers in different shades of pink so that it also had an Ombre look. I love pink so I stuck to pink.

We had to bake, cool & decorate in 4 hours (It was so hectic!) & this practical was to see how we work under pressure. I just had to keep going even though my plan just was not working out. I even cut myself with a bread knife (most painful & stupidest cut ever) so that slowed me down even more as the blooooood just wouldn't stop so I had to cover it (You know that finger glove thing you see Chefs wearing on TV whilst cooking or in a challenge when they get cut? Ya it took me about 5 minutes to sort myself out there) & just keep going even though it was BURNING. 


Many things didn't work out as plan but I was 70% happy with the overall look. However, there is LOTS of space for improvement. Also, I was the last one in my class to finish. OOPS. 


Hope you kind off like the pictures! 


The Pink Ombre on the side.

Flowers and dots on the top with glitter. I love sparkle.
I made the flowers flow in a trail across the slice of cake and down the sides. My Lecturer, Chef Julia said it looked like how something would flow on a dress. 

Until next time, keep your life frosted! <3

Tuesday, 6 May 2014

Caramel Millionaire Shortbread, Checkerboard Biscuits & Butter Biscuits

In this practical we made more biscuits! I was so tired of biscuits after this week LOL. 

Enjoy the pictures! I had fun in this practical, didn't take it so seriously, was busy doing my own thing. 
'


The end product! Caramel Millionaire Shortbread in the two hearts. Checkerboad biscuits in the loaf tin & butter biscuits in the round tins.

The Mise En Place for the white vanilla part of the checkerboard biscuits.

Team work to lift the checkerboard biscuit over in order to create the checkerboard look. It was really cracking and breaking due to it being so soft LOL.

Last one to turn over, almost there. 

Baked and out the oven & you get CHECKERBOARD biscuits! However, checkerboard supposed to be 2 layers, not 4. LOL oh well .. 

I am done making my butter biscuit dough and about to roll it out and cut out my shapes!

Butter biscuits baked and out the oven. Just had some fun drawing and writing on them with royal icing.

More butter biscuits! I cut out star and circle shaped biscuits.

Until next time, keep your life frosted! <3


Brandy Snaps & Sable

Shew, I haven't posted in a long while :| 

This was a practical done at campus a few weeks ago. I'll just let the pictures say it all. 


These are brandy snaps. Once out the oven and whilst they are HOT, you're supposed to shape them. We shaped ours against a dariole mould & we molded some cigar shapes. The cigar shapes are ideal for custard to be piped into them & then to dip the cigar in chocolate. Our round bowl ones are perfect to hold a scoop of ice cream etc.

My Mise en place for the Brandy Snaps

Mise en place done for the Sable (which are basically biscuits) 

The brandy snaps mixture whilst hot. We had to wait for this sticky gooey mixture to cool so that we could mold it into round little flat balls on a baking tray. We noticed it was easier to spoon an ugly lump of this mixture onto a baking tray and leave it to cool there. Once cool then you could mold it and neaten it up from its ugly self.


Some of the Sable after they were baked and after they were dipped in chocolate.
The Sable piped on a baking sheet ready to go into the oven.
Until next time, keep your life frosted! <3