You have to beat the sugar and eggs over a double boiler (A double boiler is basically a pot or bowl over another pot of steaming water - this water must not touch the bowl with the mixture in it, the steam is only what's needed) until it reaches ribbon stage. We don't get to use the electrical mixers (guess you got to learn it the hard way) so yeah, my partner, Tereen, & I had to beat this mixture until it was ribbon stage. & we had to beat it fast as this is how air was going to get incorporated into this cake to help it rise. We baked this cake day before yesterday - I clearly didn't need to visit the gym on that day as my exercise was done.
 |
| When this pic was taken, I clearly was whisking as fast as I could. Clearly. |
Once the caked was baked, we left it overnight, so yesterday we had to finish it off. We had to crumb coat it (or dirty ice it) as some people say which is basically a thin layer of icing (you have to add some milk to your icing to make it abit liquidy & then apply it onto your cake) This layer is to basically coat over the crumbs (hence the name, crumb coating) so that when you apply your final layer of icing, you don't get any crumbs into it.
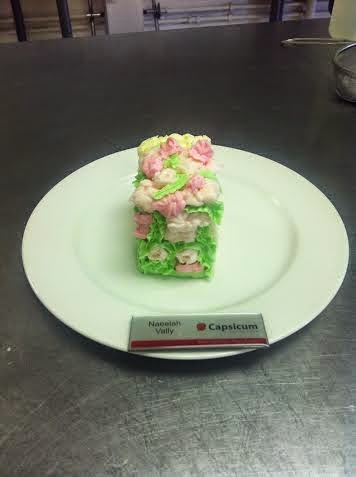
I decided to make some basic round flowers and some pansies in light pink with some mini roses (roses is not my strong point at the moment so I tried to stay away from that) and some more pansies in a darker pink shade. Tereen & I decided to keep our colours very traditional and pastel so both our slices of cake were the same colours.
So my flowers were very small (I love petite things) & I bunched them all up together and iced some on top of the others to give it a bunch of flowers garden look. I piped some leaves which I made come down the side of the cake. I rolled the one side of the cake in toasted coconut as I felt the colour of the coconut (off white after we toasted it) will go better with the pastel colours rather than vermicelli.
So ya, I'm just going to let the pictures say the rest! I'm going to keep practicing how to pipe the buttercream flowers & one day will upload another picture of the same slice of cake & then we can see the improvement :)
 |
| So that's the one side where there was a basket weave & a swirly pattern. As you can see the flowers are coming off the edge. |
 |
| This is the other long side of the cake. I rolled this side in toasted coconut. |
 |
| & this is the other short side of the cake. There was flowers on top of the cake and then a few coming down. & then a whole lot of leaves. |
 |
| So ya basically that's my cake :) |
Until next time, keep your life frosted! <3


No comments:
Post a Comment