Contributors

Thursday, 17 April 2014

Chocolate Chip Cookies & Langues De Chat Chocolate Dipped Biscuits.

Today we baked more biscuits! Chocolate Chip Cookies and Langues De Chat Chocolate Dipped Biscuits .. I'm guessing that's a French name? Any French people reading this can help? LOL.

So I made the Chocolate Chip Cookies & my station partner Sihle made the Langues De Chat Chocolate Dipped Biscuits. However, we both helped each other during both the processes - team work you know?

To be honest, the Langues De Chat Chocolate Dipped recipe was a flop. I mean it supposed to work, but it didn't. My Chef Lecturer, Chef Julia is currently away due to health reasons so we have Chef Afzal who is in charge of us and he also couldn't figure out why this recipe wasn't working. Well, some recipes flop due to the climate, ingredients manufactured by different companies & so on. It can work in some parts of the world but might not work in other parts of the world. However, it tasted GOOD.

As for the Chocolate Chip Cookies, I had a lot of fun as I used biscuit cutters in the shape of MINI BUTTERFLIES AND HEARTS :D The recipe said you should place spoonfuls on a baking tray and press it down till about 5mm thick & then bake - that was just too boring for me.

I shall let the pictures say the rest! :)


My messy station whilst making the Chocolate Chip Cookies! At this stage, I just started cutting out the butterfly shaped cookies.
All my Mise-en-place done for the Chocolate Chip Cookies. Mise-en-place is basically the preparation for whatever you need to do for the recipe so for example measuring and placing all the ingredients needed in front of you for the recipe and so on. Mise-en-place MUST be done beforehand. 


The molds I used to cut the heart & butterfly shaped cookies out :)
Heart shaped Chocolate Chip Cookies (some with a white chocolate chip on top) ready to go into the oven.


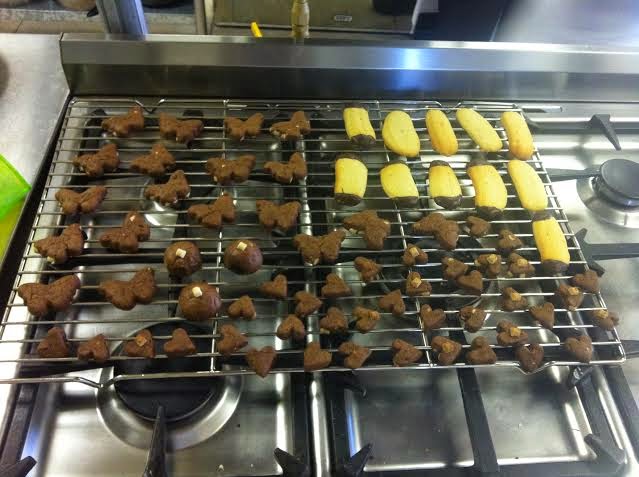
Out the oven and busy cooling down on a wire rack.


This was what the Langues De Chat Chocolate Dipped Biscuits looked like at the end. Sihle did a great job as they really tasted good. As you can see, they were dipped in chocolate on the ends. We melted some dark chocolate for this.


The end product :)  Next time I would melt some white chocolate chips and use a writing nozzle to pipe details and just some outline of the wings etc on the butterfly cookies. The reason I didn't do it this time was because the chocolate chip cookies were already so 'chocolate-tey' due to it having white chocolate and dark chocolate roughly chopped in the batter. However, if you are a die hard rich chocolatey fan, then piping white chocolate to make the butterflies look a bit more pretty than they already are and to add another texture of chocolate is the way to go for you. 

These Chocolate Chip Cookies & Langues De Chat Chocolate Dipped Biscuits was made by a fellow student in my Pastry Class named Santhil Ramdhani. The reason why I'm posting a picture of his food stuff is because I found his end product so cute. He didn't use a cutter but he just created simple balls for his Chocolate Chip Cookies and then pressed his thumb in the middle and placed some white chocolate chips. I asked what it was, he said, "NESTS". How cute? It does look like nests with little eggs in it. You could see he was in the Easter mood LOL.
Until next time, keep your life frosted! <3

Wednesday, 16 April 2014

Almond Biscotti and Sponge Fingers

So today in our practical we prepared Almond Biscotti & Sponge Fingers. We had to do the Almond Biscotti as a team and the Sponge Fingers separately. What my station partner, Sihle & I decided to do was he would make the Almond Biscotti & I will make 2 recipes of Sponge fingers to make it a quicker process & to avoid a lot of extra dishes.

So with the Almond Biscotti, you basically end up with a dough that you have to shape into a log about 6cm thick. You bake that log at 160 degrees Celsius for 30-40 minutes. Once baked, you remove it from the oven, slice diagonally about 12mm thick, then place the slices on a baking tray or sheet pan and put it back into the oven to bake until 135 degrees Celsius until toasted or golden brown. This process is basically to really dry out the Biscotti.

So below I just have some pictures of Sihle getting the dough to the correct consistency before he molds it into log shapes.


As for the Sponge Fingers, we had to make the mixture which was just eggs, castor sugar, cake flour and cornflour. The picture below just shows me almost done with the folding process. I had to fold the flour into the sugar and egg mixture.

As you can see there was still some flour on the side which I had to fold in. I was using a wooden spoon to fold in the flour. If you have done the folding in method before, it'll be really easy for you to see the 'lines'  that have been formed by folding in, especially straight through the middle. 
Once that was done, you had to put the mixture in a piping bag & pipe some 'log' shapes onto a baking tray and bake for 200 degrees Celsius. The time that it takes to bake depends if it's a lot of mixture in a mould or just piped like how I did - it took maximum 10 minutes in the oven for me. Once removed from the oven, you just sprinkle some castor sugar on top whilst the Sponge Fingers are hot!

So that's Almond Biscotti & Sponge Fingers!

& that's the final product! Sponge Fingers on the left & Almond Biscotti on the right. I sprinkled a bit of glitter on the sponge fingers just because, I felt like it. No harm in adding a lil bit of sparkle, right? 

Until next time, keep your life frosted! <3

Tuesday, 15 April 2014

POPSICLES

So this is something that when I see, it screams "CHILDHOOD!"

I grew up eating these! I use to go to my grans house every day and take a walk to the cafe up the road .. It was those typical Coca-Cola sign cafes that just sold the basic groceries of a household including stationery, cheap toys, lots of sweets and chocolates & of course POPSICLES.

Some of you might call it ice lollies etc but we just called it POPSICLES. There's no label or sticker on the packaging, even when you purchase a whole bag of it, so I'm not sure exactly what the official name is. 


Popsicles is basically flavoured iced. The flavouring is so delicious but it stains your tongue pink! I can't say it does this beacause it's a cheap flavouring (slush puppy stains your tongue too!) but it's just SO WORTH IT.

It use to be 50c for the big one but recently (Like 2 days ago) I bought a POPSICLE because I was driving past with my dad & it was R1 - recession didn't affect it that much! & the best part is that it still tasted the same! 


The 'traditional' childhood way for me was to buy a POPSICLE, wrap a toweling paper around it because it was SO COLD (use to burn my skin) & then bite the corner of the plastic & then you just eat it like that. There was no such thing as scissors. 

Two days ago I decided to relive my childhood, you should do it sometimes too! It's worth it :) 


Until next time, keep your life frosted! <3

Friday, 11 April 2014

Icing a Genoise Sponge Piece of Cake

So first thing is, what is a Genoise sponge? Btw it's pronounced as Jin-nooh-wah or so I've been told. What's the difference between a Genoise sponge and a Victorian sponge? Basically a Genoise sponge uses air to rise whereas a Victorian sponge will use baking powder, or bicarb - basically a chemical raising agent.

You have to beat the sugar and eggs over a double boiler (A double boiler is basically a pot or bowl over another pot of steaming water - this water must not touch the bowl with the mixture in it, the steam is only what's needed) until it reaches ribbon stage. We don't get to use the electrical mixers (guess you got to learn it the hard way) so yeah, my partner, Tereen, & I had to beat this mixture until it was ribbon stage. & we had to beat it fast as this is how air was going to get incorporated into this cake to help it rise. We baked this cake day before yesterday - I clearly didn't need to visit the gym on that day as my exercise was done.


When this pic was taken, I clearly was whisking as fast as I could. Clearly.

Once the caked was baked, we left it overnight, so yesterday we had to finish it off. We had to crumb coat it (or dirty ice it) as some people say which is basically a thin layer of icing (you have to add some milk to your icing to make it abit liquidy & then apply it onto your cake) This layer is to basically coat over the crumbs (hence the name, crumb coating) so that when you apply your final layer of icing, you don't get any crumbs into it.


This is what crumb coating looks like. So you can still see the cake but after you crumb coat the cake & leave it to dry, the crumbs will be sealed in. This is a pic of my partner Tereen's cake as I already applied a lil bit of my final icing coat on my cake & I forgot to take a pic. 


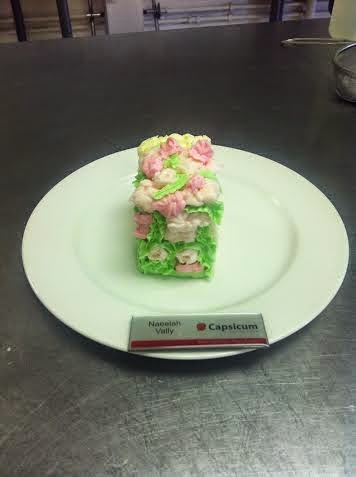
So this is my cake. Crumb coating done & dried & I've just started applying the icing for the final coat. As you can notice, the icing for the crumb coating and the icing for the final layer of coating are two TOTALLY different textures. If you want to know how to apply the final coating of icing smoothly, then check out my blogpost 'Icing a Victorian Sponge Piece of Cake' - (http://www.frostedamor.blogspot.com/2014/04/icing-victorian-sponge-piece-of-cake.html) where it is explained.

After this was done, we had to decorate our piece of cake! The instructions from Chef Julia was that we had to ice a basket weave one side coming up to the top of the cake, roll the one side in vermicelli or toasted coconut (rolling is basically covering the cake in something for example vermicelli by placing the cake into the vermicelli. If it's a round cake then it will be 'rolled' ), a swirly pattern with a petal nozzle on one half side of the cake next to the basket weave & then flowers on the top.

I decided to make some basic round flowers and some pansies in light pink with some mini roses (roses is not my strong point at the moment so I tried to stay away from that) and some more pansies in a darker pink shade. Tereen & I decided to keep our colours very traditional and pastel so both our slices of cake were the same colours.

So my flowers were very small (I love petite things) & I bunched them all up together and iced some on top of the others to give it a bunch of flowers garden look. I piped some leaves which I made come down the side of the cake. I rolled the one side of the cake in toasted coconut as I felt the colour of the coconut (off white after we toasted it) will go better with the pastel colours rather than vermicelli.

So ya, I'm just going to let the pictures say the rest! I'm going to keep practicing how to pipe the buttercream flowers & one day will upload another picture of the same slice of cake & then we can see the improvement :)

So that's the one side where there was a basket weave & a swirly pattern. As you can see the flowers are coming off the edge.
This is the other long side of the cake. I rolled this side in toasted coconut. 

This is the one short side of the cake which was covered in basket weave. Doing basket weave on a flat surface is totally different from doing it on a cake and coming down the one side of the cake, TRUST ME.

& this is the other short side of the cake. There was flowers on top of the cake and then a few coming down. & then a whole lot of leaves.
So ya basically that's my cake :)

Until next time, keep your life frosted! <3

Thursday, 10 April 2014

Piping Skills: Flowers, Leaves & Basket Weaves!

Piping is something that you just can't get enough off. It's frustrating when you're a beginner (Me) but you just have to keep practicing. There's many times when I give up but inside of me, I don't want to give up. Eventually after all the bragging and moaning, you just got to get back to it. & to top it all off, working with buttercream icing and piping is a nightmare when the weather is humid, which Durban is a lot of the times. I just can't wait for Winter so things can be a bit better between buttercream icing and I (Another reason to add to the list about why I love Winter) .. However, Chef Julia gave me some advice today by saying that I should just beat in an egg white, & that'll make the icing dry a bit harder. 

So I haven't completed learning how to pipe all the flowers. The rose was flopping due to the icing being so soft but I kind of get the hang of the Pansies, but shew, I need A LOT more practice. I am going to be practicing more roses, daisys, chrysanthemums, rose buds, half roses, sweet peas, half carnation, tulips and whatever other icing flowers you can create! It's going to take me a long while but I want to become a cake decorator - I HAVE TO LEARN HOW TO PERFECT IT.
So have a look at my pics & years from now we'll all look back and have a good laugh at how ugly they look but how perfect they would be looking at that present time? Improvement is magical.


Lil piping session I set up for myself at home to practice piping.
Pansies with a touch of red .. Getting there slowly but surely.
Another Pansie but extra folds? :/ Not sure LOL.

OOops. A melted Pansie. Sies. 
Leaves. Bunged up type.

Long straight leaves.
Short straight leaves. 
Something that looks kind of decent! LOL a basket weave. 
Until next time, keep your life frosted! <3 

Sunday, 6 April 2014

My Experience at Beluga, Gateway, Durban.

I would say that Beluga is definitely a fine-dining restaurant. From the beautiful, perfect looking hostesses to the waiter placing that handkerchief on your lap to the very intricate, detailed menu items to the unusual, & I mean UNUSUAL flavours in their food! It's a pity they are not Halaal, otherwise I would want to try out everything on their menu!

Yesterday my friends & I decided to eat there. I ate a starter portion of Calamari as I needed to keep some space for dessert at Chocolate Bar afterwards whilst my friends enjoyed platters of SUSHI.

I must say, my Calamari starter was DELICIOUS! I have never tasted Calamari like that before (& I have tasted Calamari from A LOT of places) .. It was spice-fried baby calamari, crispy pickled vegetables with a spicy PEANUT dressing .. PEANUT & CALAMARI? Unusual or what? Yes it was pricey (R60 for such a small starter) but it was worth it! It tasted GOOD!

My friends had a platter of Hand Rolls, California Rolls, Maki & Tuna Crunchies. I tasted a Tuna Crunchie ( it was deep-fried so technically it isn't Sushi Sushi. I still have to taste proper Sushi LOL). One thing I have to admit, I will definitely eat the Tuna Crunchie again. When I tasted it, I felt like, "WHY ON EARTH DID I TAKE SO LONG TO TASTE THIS?" I can't even describe the sensations that went through me as every piece of that Tuna Crunchie touched my tongue. Those flavours that erupted - my palette was in HEAVEN! 


Oh, back to my friends & THEIR sushi, they loved it. You could just see it on their faces. There was the "mmmmm" sounds now & then.

As for the drinks, since I'm fussy about my Kola Tonic & Lemonade being strong enough, they were spot on! Correct amount of Kola Tonic, correct amount of ice & the cherry on the top - the slice of lemon <3


As for the setting of Beluga, it has an ambient atmosphere with an urban vibe due to the decor being very sleek & factorial (almost like a lofty factory). Beluga can seat 400 guests but you can still feel the intimate vibes due to the dim lighting & very simple but sleek decor. 

A pricey restaurant but hey, good service, good food, good atmosphere, I definitely will be visiting again. Next time, I want to try the Thai Prawn which consists of lemongrass, garlic, chilli & coriander FRITTERS? These menu items excite me!

They do have a menu online on their website: www.beluga.co.za 


Enjoy the pictures! & if you decide to pop into Beluga, let me know about your experience! 


My Starter Calamari - Bursting with flavour!


My friends Sushi plates. The first plate facing the camera, on the left hand side of that plate, yes those delicious things with blobs of sauce on top are the Tuna Crunchies. DELISH!
Our drinks! Appletiser, Passion Fruit & Lemonade & Kola Tonic & Lemonade.
P.S: I love the glasses. It's like a curvy shape, like an elongated cylinder. Quite cute. 

Until next time, keep your life frosted! <3

Friday, 4 April 2014

Icing a Victorian Sponge Piece of Cake

After practicing our piping skills [read the last blogpost about it :) ] we had to decorate a piece of cake .. This was a Victorian Sponge Cake that we prepared in the last practical.

We had to crumb coat it or 'dirty ice' it as they say to avoid the crumbs mixing into our final coating of icing. We crumb coated it by using the same buttercream icing but by just adding a lil bit of milk to make it a lil runny so that it's thin when applied on the cake as crumb coating is a very, very, VERY thin layer.

After we waited a while, we applied the final coating of icing. I must say, this took the longest to apply as it had to be SMOOTH! In order to achieve the smoothness, you have to make sure your palette knife is constantly HOT.

In order to do this, keep your knife standing in a bucket of boiling water & wipe before using it to smooth the icing down. After every 'smoothing it down' motion you MUST return to your knife to the bucket of hot water. I didn't return it to the bucket a lot at first, I would do 2 or 3 'smoothing it down' motions before returning it and this action made the icing stick to my palette knife and a piece of the cake actually stuck to my palette knife too as I lifted the knife off the cake. Immediately I had crumbs in my icing which was wrong, therefore it's VERY important to constantly keep dipping your knife in boiling hot water. As Chef Julia says, remember the knife must be hot, NOT wet!

After that mission came the fun part - PIPING! I used a middle size star nozzle. I piped a border on the bottom of the cake and up the corners. I piped round circular flowers that looked a bit like roses on the top of the cake. & a bit of small star looking flowers around the middle of the cake.

Ya that's it from me. More cake decorating going to be done next week! Enjoy the pics & leave your comments!


Until next time, keep your life frosted! <3

Practicing Piping Skills

This week we were practicing piping skills! Piping skills is really important for me personally because in the future I want to work mostly with cakes & cupcakes.

I still have a lot more to practice & of course experiment with but for now I played around with the round nozzle, the flower nozzle, the star nozzle (one of them, since there's so many).

It's amazing how you can create so many different styles with the same nozzle by just moving in a different direction & holding the nozzle in a different angle - either 45 degrees or 90 degrees.
We also baked a Victorian Sponge Cake after practicing our piping skills which we iced and decorated the next day with our newly learnt piping skills. Make sure you check out the next blogpost which is going to be some of the piping skills I learnt, ON the Victorian Sponge cake! 

On Tuesday we made piping bags out of wax paper. It was a basic skill needing to be practiced so that in the industry one day, we can prepare a whole lot of piping bags if we need to use a lot of colours & then dispose the bags off afterwards. 

Hope you enjoy the pictures! Yes some are bad LOL but practice makes perfect! 


Practicing borders borders borders .. 

We had to practice writing our name! The bottom pattern needs a lot of working on :/

I'm getting there! Slowly but surely!


Got it right on the last attempt! YAY!

Excuse that last heart haha


Some Borders
Piping bags that we made! 
Until next time, keep your life frosted!